
mmd3d数据提取、模型搭建过程
熟悉mmdetection3d数据提取、模型搭建过程
1、读取配置文件
1.1 mmdetection3d配置文件的组成
配置文件存放于mmdetection3d/config目录下,其中base_目录为mmdetection3d自带的基础配置,即原始配置,从_base目录的组成来看,mmdetection3d将配置文件分为四种,分别是:数据集 (dataset),模型 (model),训练策略 (schedule) 和运行时的默认设置 (default runtime)
下面基于一个配置文件的部分内容,解释一下该怎么看
# configs/centerpoint/centerpoint_01voxel_second_secfpn_4x8_cyclic_20e_nus.py
_base_ = [
    '../_base_/datasets/nus-3d.py',
    '../_base_/models/centerpoint_01voxel_second_secfpn_nus.py', # 继承了这个模型的基础文件
    '../_base_/schedules/cyclic_20e.py', '../_base_/default_runtime.py'
]
model = dict(
    pts_voxel_layer=dict(point_cloud_range=point_cloud_range),
    pts_bbox_head=dict(bbox_coder=dict(pc_range=point_cloud_range[:2])),
    # model training and testing settings
    train_cfg=dict(pts=dict(point_cloud_range=point_cloud_range)),
    test_cfg=dict(pts=dict(pc_range=point_cloud_range[:2])))
可以看出,在centerpoint_01voxel_second_secfpn_4x8_cyclic_20e_nus.py这个文件中,model部分只有一小段内容,这是因为继承了centerpoint_01voxel_second_secfpn_nus.py,只是在继承文件的基础上来修改或添加某些特定字段
为了方便说明,来一份简化版的配置文件
# configs/_base_/models/centerpoint_01voxel_second_secfpn_nus.py
model = dict(
    type='CenterPoint',
    pts_voxel_layer=dict(
        max_num_points=10, voxel_size=voxel_size, max_voxels=(90000, 120000)),
    pts_voxel_encoder=dict(type='HardSimpleVFE', num_features=5),
    pts_middle_encoder=dict(),
    pts_backbone=dict(),
    pts_neck=dict(),
    pts_bbox_head=dict(),
    # model training and testing settings
    train_cfg=dict(),
test_cfg=dict())为了查看具体网络是怎么实现的,我们首先从model最开始出发,根据配置文件,第一个字段为type,上述例子中使用了CenterPoint,我们需要在mmdetection3d/mmdet3d/models/detectors/init.py中,找到CenterPoint,看一下是从哪里引入的,如下图所示,这样一来,我们找到了实现网络的具体位置,路径为:mmdetection3d/mmdet3d/models/detectors/centerpoint.py

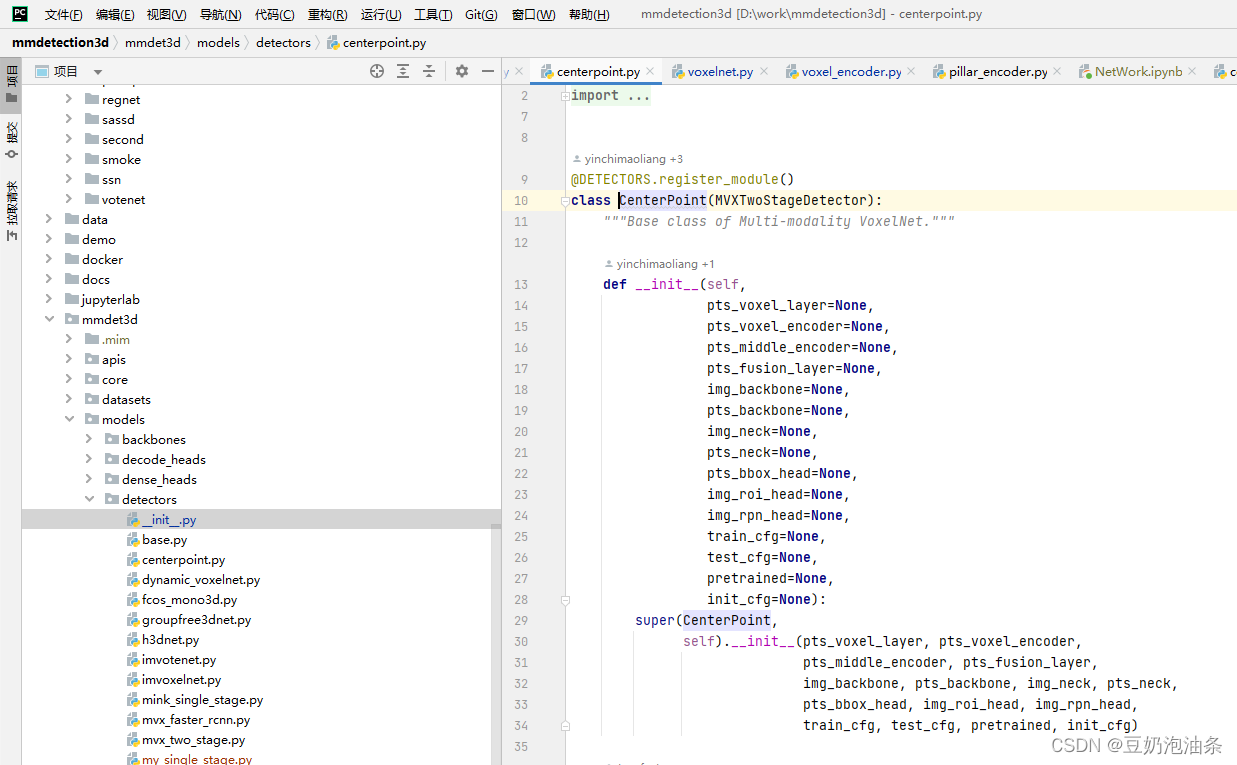
再往下走,有一句:python pts_voxel_layer=dict( max_num_points=10, voxel_size=voxel_size, max_voxels=(90000, 120000)),
我们在mmdetection3d/mmdet3d/models/detectors/centerpoint.py中的__init__方法中,找到对应初始化字段pts_voxel_layer

但是我们在此发现,这里并没有使用这个字段,这是因为CenterPoint类继承了MVXTwoStageDetector类,我们顺藤摸瓜,查看MVXTwoStageDetector类,发现这个类使用了pts_voxel_layer字段,并且给出了使用过程。Voxelization(**pts_voxel_layer)为封装好的一个体素化函数,它返回一组能表示体素的参数,这里我们不关心具体实现。另外,根据上图可以看出,init方法里所有的字段与配置文件中的字段是对应着顺下来的,也就是说,我们可以从centerpoint类里顺藤摸瓜,找到所有配置的具体实现

至此,第一行分析完毕,再往下走,是一句pts_voxel_encoder=dict(type='HardSimpleVFE', num_features=5),分析方法与上面相同。
1.2 使用base配置文件构建自己的配置文件
这部分我们继承基础配置文件,构建一个简单的配置文件,以便接下来使用
- 首先,我们在configs目录下创建一个文件夹,用于保存自己的配置文件,并新建一个my_config.py文件
- 在新建的配置文件中,写入以下内容
_base_ = [
    '../_base_/datasets/nus-3d-mini.py', # 这里我继承了基础文件中的nus-3d.py构建了一个mini版本,主要就是修改了一下数据集路径
    '../_base_/schedules/schedule_2x.py',
    '../_base_/default_runtime.py',
]
voxel_size = [0.1, 0.1, 0.1]
norm_cfg = None
DOUBLE_FLIP = False
# 为了简单演示,这里只实现了体素构造层和编码层
model = dict(
    type="MY_MODEL",
    voxel_layer=dict(
        max_num_points=32,
        point_cloud_range=[0, -39.68, -3, 69.12, 39.68, 1],
        voxel_size=voxel_size,
        max_voxels=(16000, 40000)),
    voxel_encoder=dict(
        type='VoxelFeatureExtractorV3',
        num_input_features=4
    ),
    train_cfg=dict(),
    test_cfg=dict())
data = dict(
    samples_per_gpu=1,
    workers_per_gpu=4
)
1.3 根据配置文件搭建网络
接下来要做的,是根据我们配置文件中的model部分,开始搭建网络,具体步骤如下:
- 在mmdet3d/models/detectors目录下,创建一个py文件,这里取名为my_model.py
- 构造一个类,类名要和配置文件中的type一致,当然也可以在注册的时候用import … as …来替换:
from ..builder import DETECTORS # 引入构造器

@DETECTORS.register_module() # 注册,这一句必须要有
class MY_MODEL():
    def __init__(self):
pass- 在mmdet3d/models/detectors/*init*.py中注册:

- 在此例中,便于理解,我们就不继承任何文件了,仅写出初始化方法
- 接下来要做的,是要在init方法中定义相关参数并给出相应实现
from mmcv.ops import Voxelization # 引入mmcv中的体素化方法
from .. import builder  # 引入构造器
from ..builder import DETECTORS

@DETECTORS.register_module()
class my_model():
    def __init__(self, voxel_layer, voxel_encoder, train_cfg, test_cfg):
        self.voxel_layer = Voxelization(**voxel_layer) # 这一层是mmcv自带的,在3.4中会再介绍一下
self.voxel_encoder = builder.build_voxel_encoder(voxel_encoder) # 这里表示这个层是需要我们自己构造的- 再一步,是实现我们的voxel_encoder层,我们在mmdet3d/models/voxel_encoders目录下,新建一个文件也好,直接写在现有文件里也行,这里我写在了voxel_encoder.py文件下
@VOXEL_ENCODERS.register_module() # 注册为体素编码层
class VoxelFeatureExtractorV3(nn.Module):
    def __init__(
            self, num_input_features=4, norm_cfg=None, name="VoxelFeatureExtractorV3"
    ):
        super(VoxelFeatureExtractorV3, self).__init__()
        self.name = name
        self.num_input_features = num_input_features

    def forward(self, features, num_voxels, coors=None):
        """
            features: 输入的体素
            num_voxels: 体素数目
        """
        points_mean = features[:, :, : self.num_input_features].sum(
            dim=1, keepdim=False
        ) / num_voxels.type_as(features).view(-1, 1)

return points_mean.contiguous()再一步,是在mmdet3d/models/voxel_encoders/init.py文件中,引入写好的VoxelFeatureExtractorV3,这样,我们就能在配置文件中,使用voxel_encoder=dict(type='VoxelFeatureExtractorV3', num_input_features=4)来调用我们的体素编码模块了

2、构建模型
此部分,我们使用jupyter notebook逐步、分解的从数据抓取开始,演示一下数据在我们搭建的网络中的运行流程2.1 读取配置文件
在真正的训练过程中,是通过传入的参数,根据配置文件路径导入整个参数的,相关代码位于tools/train.py。这里为简便期间,我们直接使用路径读取配置文件
# 读取配置文件
from mmcv import Config

config_file = "/home/wistful/work/mmdetection3d/configs/my_config/my_config.py"
cfg = Config.fromfile(config_file)
print("cfg type:",type(cfg))
print("cfg.model type:",type(cfg.model))
cfg.model  # 打印模型部分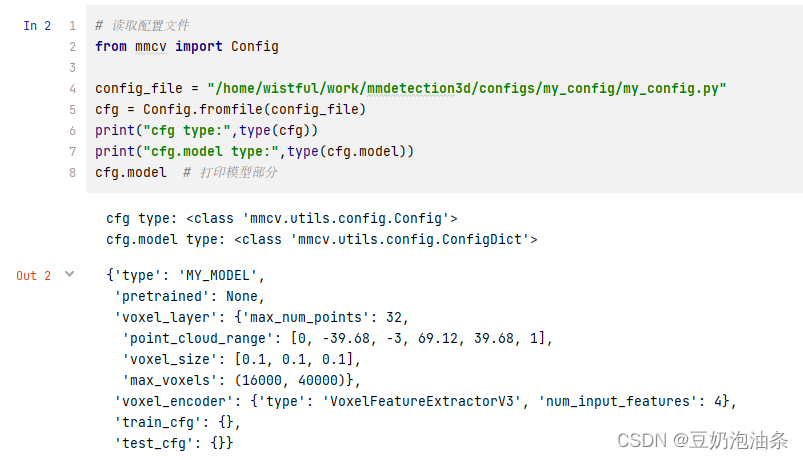
可以看出,打印出来的模型结构,与我们配置文件中的一样。其中,cfg和cfg.model等等的数据类型在此就不介绍了
2.2 读取数据
# 取数据
from mmdet3d.datasets import build_dataset

datasets = [build_dataset(cfg.data.train)]

print("datastes type:", type(datasets))
print("datastes[0] type", type(datasets[0]))
print("datastes[0][0] type", type(datasets[0][0]))

datasets[0][0].keys()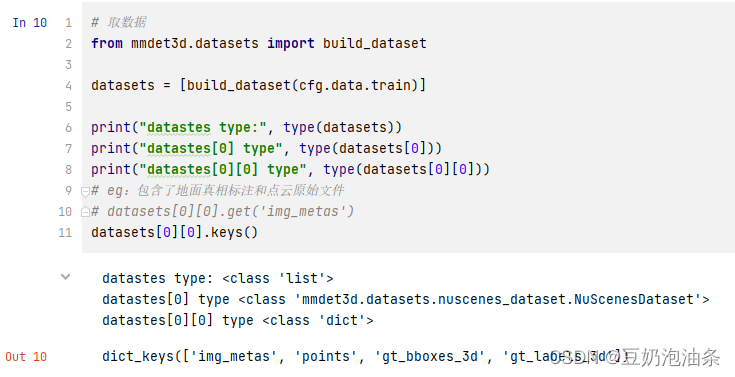
这里,就不再解释相关内容了,只需要明白datasets为一个长度1的列表,datasets[0]为一个nuscenes数据集类型,datasets[0][i]是nuscenes数据集的所有内容,每一项包含了四部分内容:‘img_metas’, ‘points’, ‘gt_bboxes_3d’, ‘gt_labels_3d’
实际上,在真正训练或测试过程中,还需要一个data_loader迭代器,方便我们去多线程地读取数据,并且可以实现batch以及shuffle的读取等,mmdet已经帮我们实现了,这里我们由于只需要一条数据模拟一下流程,就不构造data_loader了
2.3 构造模型
# 构建模型
from mmdet3d.models import build_model
model = build_model(
    cfg.model,
    train_cfg=cfg.get('train_cfg'),
    test_cfg=cfg.get('test_cfg')
)
model
3、运行流程
3.1 voxel_layer:点云 -> 体素
# 示例文件配置中,第一步是voxel_layer层,将点云编码为体素

voxel_layer = model.voxel_layer
# 取点云数据
points = datasets[0][0].get('points').data
# 将点云数据送入 voxel_layer
voxels_out, coors_out, num_points_per_voxel_out = voxel_layer(points)
上述代码中,voxel_layer(points)执行的是self.voxel_layer = Voxelization(**voxel_layer),Voxelization的输入输出大家可以去具体看一下
我们再使用voxel_layer.parameters打印一下参数,得到下面输出: 
现在再来回想一下我们自定义的配置文件,这里再放一下:
voxel_size = [0.1, 0.1, 0.1]
model = dict(
    type="MY_MODEL",
    voxel_layer=dict(
        max_num_points=32,
        point_cloud_range=[0, -39.68, -3, 69.12, 39.68, 1],
        voxel_size=voxel_size,
        max_voxels=(16000, 40000)),
    voxel_encoder=dict(
        type='VoxelFeatureExtractorV3',
        num_input_features=4
    ),
    train_cfg=dict(),
    test_cfg=dict())
可以看出,voxel_layer层传入的参数是我们配置文件中的内容,根据前面提到过的Voxelization的输入输出,可以看到,forward部分只缺一个points
input,即点云。在本节刚开始的代码块中,voxels_out, coors_out,
num_points_per_voxel_out =
voxel_layer(points)执行的便是将点云转换为体素操作,我们输出前后形状来看一下:

即将自定范围内的点云,按照自定体素大小[0.1,0.1,0.1],每块体素最多保留32个点,最终将32242个点,转换为了6051个体素,每个体素包含的点不一样,但都记录下来了。 3.2 voxel_encoder:体素编码
这一层,主要是将上一层(voxel_layer)的输出进行encoder,往上翻到1.3,我们给出了相应实现,这里实现较为简单,即求每个体素中的平均点。我们现在这里记一下实现中的forward函数:def forward(self, features, num_voxels, coors=None)
我们先打印一下这一层的参数 
发现没有输出,这是因为我们没有定义相关方法,我们在VoxelFeatureExtractorV3类中加一个方法:
    def __repr__(self):
        s = self.__class__.__name__ + '('
        s += 'num_input_features=' + str(self.num_input_features)
        s += ')'
        return s
再次执行就有输出了,参数也是与配置文件相同。下面代码将上一层的输出传递到这一层
```import torch import torch
voxel_encoder = model.voxel_encoder print(voxel_encoder.parameters) voxel_encoder_inputs = voxels_out # 将上一层的输出作为输入 num_voxels = torch.tensor(voxels_out.shape[0]) # 这里只用一条数据作为演示,所以要转一下tensor voxel_encoder_result = voxel_encoder(voxel_encoder_inputs, num_voxels) print("voxel_encoder output shape:", voxel_encoder_result.shape) ```

我们的配置文件和网络只给出了两个基础层的定义和实现,剩下的几层(neck、backbone…)都大同小异,都是这么个流程,完整的流程还会有损失函数的计算、反向更新等等,这一步是写在模型的forward里,此篇就不再详解了